Kemppi ArcValidation First ever automated and universal solution for welding equipment validation.
It is a universal solution that provides simple, guided and accurate validation for all welding equipment makes and models and welding processes.When validating FastMigs and other advanced Kemppi equipment, the process is automatic and very fast.
ArcValidator RC (Remote Control) is a handheld device that fits in the palm of the hand. With it, you can validate welding equipment using the ArcValidator L 650 load bank and transfer the saved validation data reports to a PC to give them the final touch. Then you can print and share the official validation certificates.
The ArcValidator RC and ArcValidator PC software together form the management interface for Kemppi arc validation solution.
This help gives you an overview of the ArcValidation system and tells you how to use the PC software to transfer data from the ArcValidator RC to PC and process validation reports and certificates. It also tells how to add and modify equipment profiles that you can use for validation with the ArcValidator RC device. Detailed instructions for setting up the system and the actual validation is found in the Quick Guide included in the product package.
Contents
- ArcValidation overview
- Validation and standards
- ArcValidator RC
- ArcValidator DataStick
- ArcValidator L 650 load bank
- ArcValidator PC software
- General requirements
- Connecting ArcValidation components
- Validation process workflow
- Manual and automatic validation process
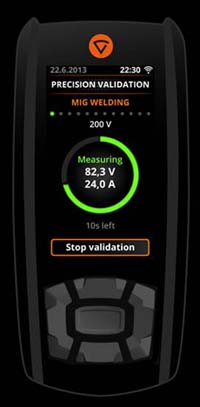
- Standard validation and precision validation
- PC application, first use and setup
- Installing ArcValidator PC application
- Installing the label printer
- First startup, filling in your company information
- Transferring validation data to the PC
- Viewing and editing validation reports
- Validation file/validation report list
- Searching for validation files
- Creating and finalizing validation reports
- Creating a new empty report form
- Exporting certificates
- Managing equipment types and models
- Adding new welding processes
- Adding new equipment models
- Updating the RC application using PC
- ArcValidator troubleshooting
ArcValidation overview
 Validation and standards
ArcValidation solution makes sure your welding equipment meets the necessary standards to accurately support welding procedures and quality requirements for overall quality and welded product safety.
It ties together the workshop and office based process and meets the local quality control and national and international validation standards requirements.
ISO 3834 "Quality Requirements for Welding" requires that your welding machine fleet is calibrated and validated.
EN 1090 is the European standard you need to follow in order to get the CE marking required for steel structure manufacturing and construction. The requirements for arc welding equipment accuracy are defined in EN 60974-1.
ArcValidation solution itself is founded on the requirements of EN 50504 for the process of validating arc welding equipment.
ArcValidator RC (Remote Control) device
ArcValidator RC is a hand-held device used for operating ArcValidator L 650 load bank, saving and transferring data to and from a PC and for controlling the validation event.
You plug it to the load bank and follow the instructions which tell you what to do, step by step, if you use the guided manual validation. When automatic validation is used, the RC takes care of the process without requiring values setting or input from you.
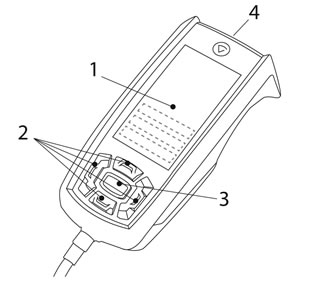
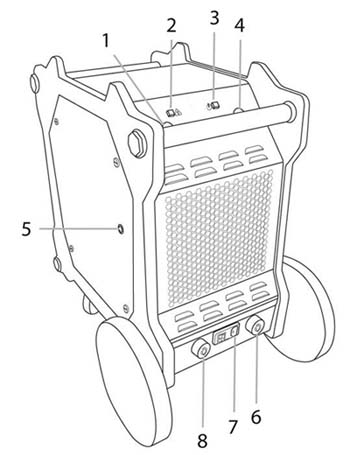
- A color display (1) for setting up the validation events, editing the equipment details and for showing the validation information and a preliminary report during and after the validation process
- The buttons (2) are for navigating in the RC menus and making the required selections (3)
- ArcValidator RC includes a barcode reader (4) in the front for faster equipment ID setup.
 |
Do not dispose of the ArcValidator RC with normal waste! In observance of European Directive 2002/96/EC, on waste electrical and electronic equipment, and its implementation in accordance with national law, electrical equipment that has reached the end of its service life must be collected separately and taken to an appropriate environmentally responsible recycling facility. |
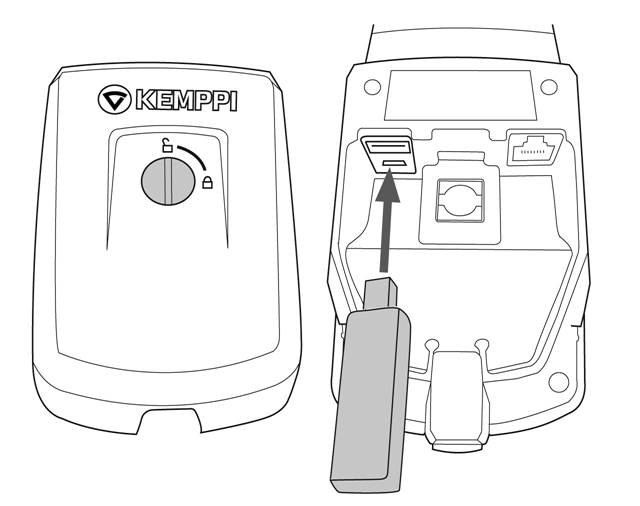
ArcValidator DataStick
ArcValidator DataStick is a USB memory stick that is used for four important purposes, all related with data transfer between the RC and the PC.
- for storing for all the validation data on the RC.
- for transferring data from ArcValidator RC to a PC for creating reports and certificates.
- for transferring equipment profiles done on the PC to the RC.
- for transferring RC software updates from the PC (the internet) to the RC.
DataStick must be in the USB port of the RC device throughout the validation, and in the USB port of the PC throughout the validation data and report modification and equipment profile modification.

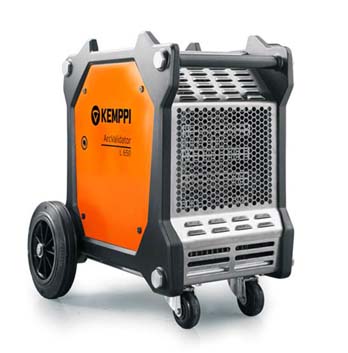
ArcValidator L 650 load bank
ArcValidator L 650 load bank or resistor is at the heart of ArcValidation. It simulates the welding arc and determines whether the actual voltage, current and wire feed speed of your welding equipment provides matches the values you set up and the values shown on the meters. The load bank can validate all kinds of welding machines up to 600 amperes current output.
As a standard, the load bank is connected to the welding machine DIX connectors. ArcValidator RC is connected to the load bank using the provided connector cable.
- RC connection
- LED indicator (temperature warning)
- LED indicator (power on)
- Control cable connection (with FastMigs and KempArcs)
- Wire insertion point for wire feeder validation
- Validation cable (DIX) connection (+)
- Power ON/OFF switch (and 1.0A fuse)
- Validation cable (DIX) connection (-).
ArcValidator PC software
ArcValidator PC software is used for reporting, certificate creation and equipment profile management. You can create professional, customised reports and certificates with customer info in place with little manual editing required. The certificates can be exported as printouts or PDFs. To print the validation labels on paper, there is a label printer available for purchase from Kemppi. For more information, see Installing the label printer.
NOTE: If you are validating other than Kemppi welding equipment, use the PC software to create the equipment profiles, and then transfer them to the ArcValidator RC using the DataStick.
General requirements
- Welding equipment with absolute unit meters
- The set current and/or voltage values must be shown in the power source display as accurately readable number values.
- The set wire feed speed must be shown in the power source display.
- A computer with Windows operating system and a USB port
- Microsoft.Net Framework 4 or newer has to be installed on the computer before installing the ArcValidation software.
- Internet connection
- For entering or editing the serial number of the L 650 load bank in your company profile. This means that you have to have an internet connection available at installation and setup of the PC application.
- For installing the ArcValidator PC software.
- For updating the ArcValidator PC software.
Connecting ArcValidation components
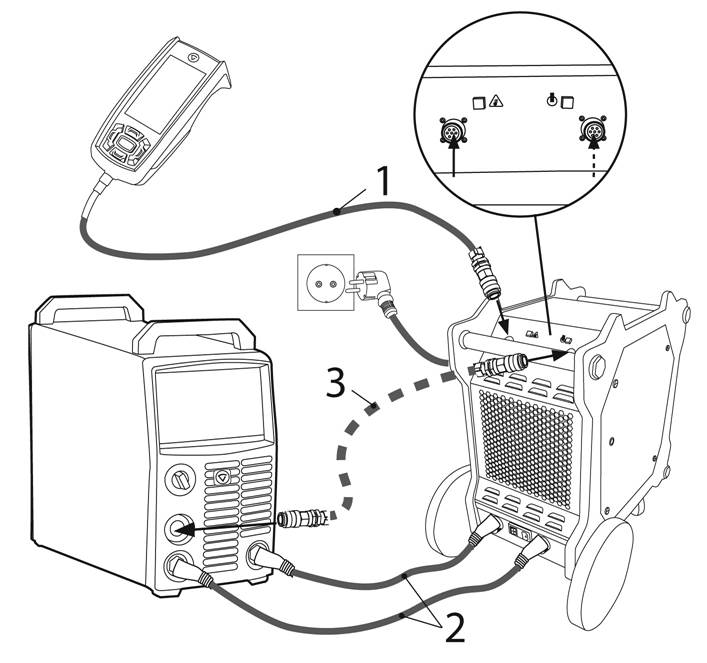
To set up the ArcValidation system, you first have to connect the components as follows:
- Connect the ArcValidator RC to the ArcValidator L 650 load bank with the RC cable.
- Connect the ArcValidator load bank and the power source with the validation cables (DIX as standard).
- With advanced FastMig and KempArc welding equipment in automatic validation: connect the control cable to the load bank and welding equipment's remote connector.
NOTE: When validating MIG/MAG equipment, the power source and the wire feeder must always be connected and turned on.
Validation process workflow
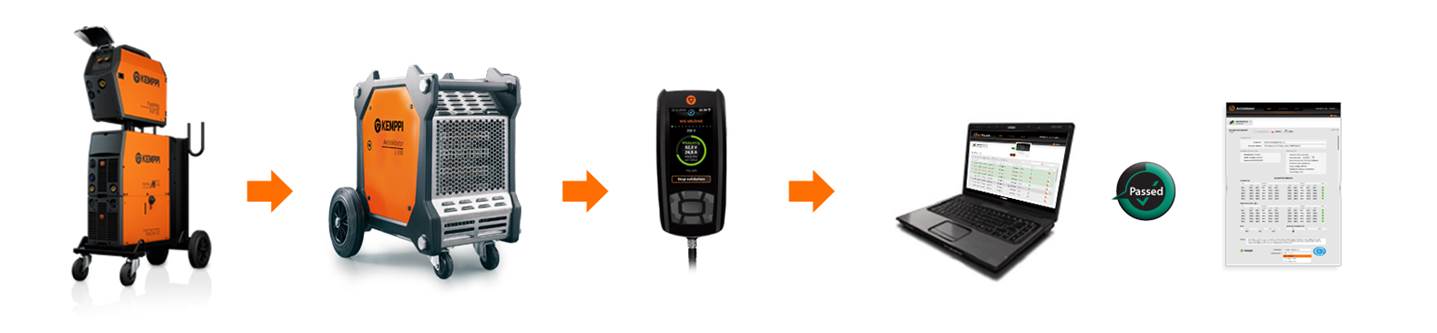
The main steps (simplified) of welding equipment validation using Kemppi ArcValidation are the following:
- Connect the equipment (welding equipment, load bank and the RC handset).
- Switch on the welding equipment and then the load bank. Wait for 5 minutes.
- On the ArcValidator RC screen, select the equipment (power source or wire feeder) validation process (Manual or Automatic) and the validation grade (Standard or Precision) and follow the instructions.
- When you get the Passed notification, move the DataStick from the RC to the PC.
- Reports are transferred to the ArcValidator PC application.
- Open and finalize the reports and export the certificates.
Manual and automatic validation process
In guided manual validation mode ArcValidation is compatible with the vast majority of welding equipment with absolute unit meters, for all makes and models as well as welding processes.
Manual validation is a streamlined and guided step-by-step process, with ArcValidator RC asking the necessary information and prompting the user forward.
In addition to the manual validation mode, an automatic validation mode is available. It controls the validated equipment independently during validation, speeding up the validation process up to 80%.
Automatic validation is available for a range of Kemppi FastMig and KempArc equipment.
In automatic validation, ArcValidator is connected to the equipment's remote connector using a dedicated control cable.
Automatic validation compatibility:
- FastMig power sources with one wire feeder attached
- Kemparc power sources with one wire feeder attached
- NOTE! With FastMig AS (FastMig M with AS panel), wire feeder must not be connected during automatic validation.
Standard validation and precision validation
You can select the validation accuracy used according to the applied standards, requirements or preferences. Standard and precision grade validation options are available as defined in the European Standard EN 50504.
NOTE: Precision grade validation is typically required twice a year, whereas standard grade validation frequency is typically one year.
PC application, first use and setup
Installing ArcValidator PC application
To install the ArcValidator PC application to your computer:
- Remove the ArcValidator DataStick from the ArcValidator RC USB port.
- Insert the DataStick to your computer's USB port.
- Browse to the DataStick root folder.
- Select the installation link.
The newest version of the ArcValidator PC software is downloaded from Kemppi's internet servers.
Run the installer and follow the on-screen guidance to install the software.
Installing the label printer
Follow the instructions below to install the necessary printer drivers for the label printer:
- To download the printer driver software, click here.
- Open the downloaded zip package, find the Setup.exe file and double-click it.
- Select Install Driver Only and the read license agreement.
- Select Kroko Pro 3600R / PearLabel 360 (Kroko 36C) from pull-down menu and click Next.
- Follow the instructions to finalize installation.
Note: Admin privileges needed for installation.
First startup, filling in the company information
After successful installation, the ArcValidator PC application starts. At first startup, you are required to fill in your company information and the serial number of your ArcValidator L 650 load bank. This information will be used in the validation reports and certificates.
You can also change the language of the application in this window.
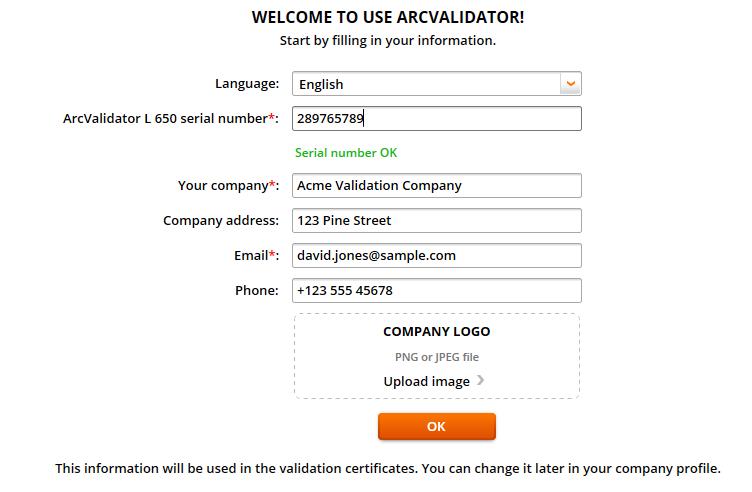
- To change the language of the application from English to another language, open the Language list and select the language you want.
- Type the ArcValidator L 650 serial number. You can find it in the load bank’s nameplate.
- Fill in the name, address, email and phone information for your company.
- To get your company logo on the validation certificates, click Import image on the right and select the image file.
- Click OK to save the information and move on to the validation file list.
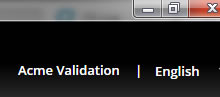
Note: You can change the company profile information later by clicking the name of your company in the upper right corner of the ArcValidator PC application, like the example below.
Transferring validation data to the PC
To transfer the validation data gathered during validation to the PC:
- Remove the ArcValidator DataStick from the RC device.
- Connect DataStick to the computer's USB port. When you do this for the first time, ArcValidator PC software must be installed.
- Let the application import the validation files from the DataStick.
- Keep the stick connected until the import has finished.
New validation files are added into the list that opens.
NOTE: the validation data files are transferred to the PC and removed from the DataStick (and ArcValidator RC).
Viewing and editing validation reports
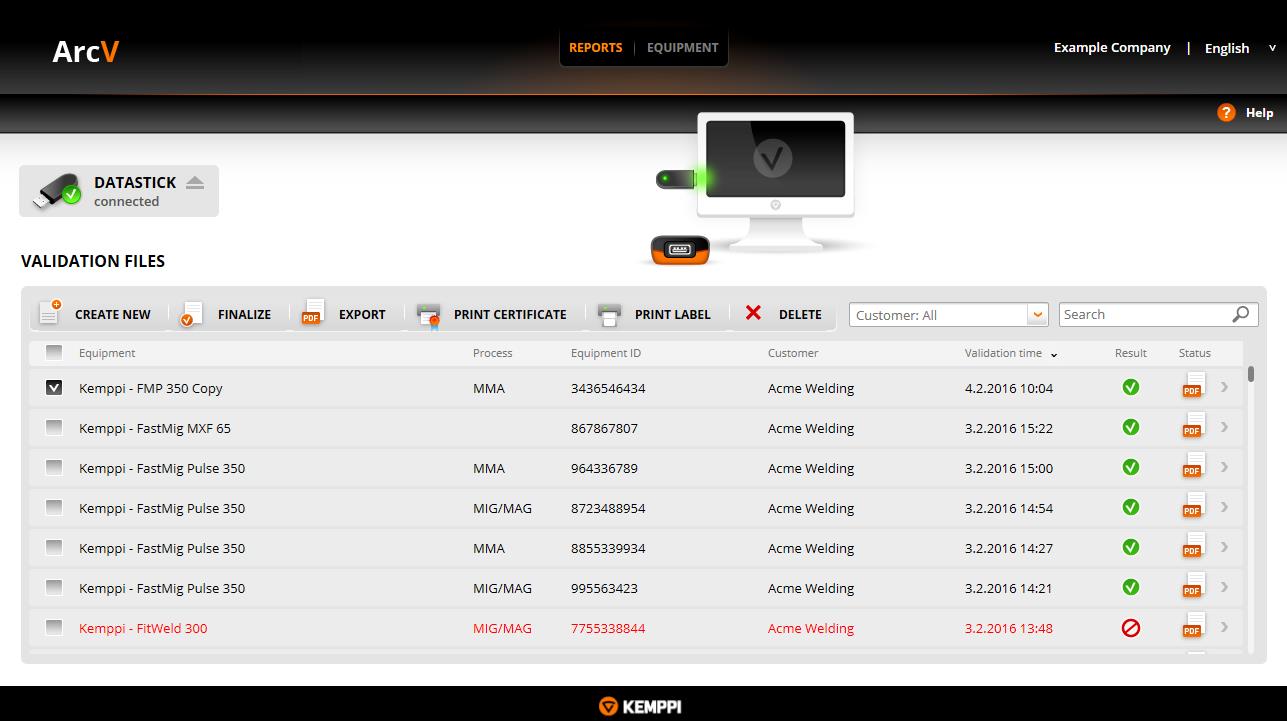
Validation report list
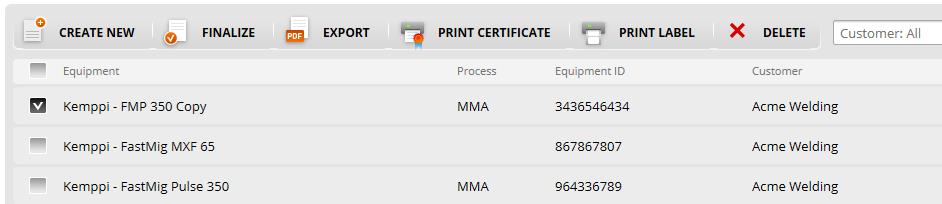
The validation files list contains the validation files that have been transferred from the RC device via DataStick. Once they have been opened, the data will be used to fill a validation report. After you have finalised the report, you can export or print it as a complete certificate.
Click the Search field on the right side of the window to search for validation files based on the name of the company or the name of the equipment.
If you want to edit, export, print or delete a single validation file, select the checkbox on the left side of the file. If you want to handle several files at the same time, select all the appropriate files.
Searching for validation files
The search function helps you to easily find a particular validation file or files. The information is sought from all the validated files in the system, including the ones just transferred.
To search for a report or reports:
Click the Search field on the right side of the window to search for validation files based on the name of the company or the name of the equipment.

The files that meet the search criteria will be shown on the top of the Validation files list.
Creating
and finalizing validation reports
Creating validation reports is simple: just opened a transferred validation file or files and a report(s) will be opened with all the validation data already in place.
To finalize a report:
- On the Validation files list, select the file or files you want to finalize and click the FINALIZE button.
- In the opening Finalize report window, fill in the required information, at least the name of the customer, the name of the validating inspector and name of the validation company.
NOTE: the validation expiration date is one year from validation by default, but if you are, for example, using Precision validation, you can change the date to, for example, 6 months. - When you have filled in all the necessary information, the Export button becomes enabled and you can export the report into a PDF format certificate. You can also print the report/certificate or just close the report form.
Creating a new empty report form
If, for any reason, ArcValidator manual or automatic validation process were not used in validation, you can fill in the information manually. This makes it possible for you to have all your validation reports in one place on the PC, even if they have been originally created using other methods.
To create a new report from scratch:
- On the Validation files list, click the CREATE REPORT button.
- Select welding equipment window opens. Select the Manufacturer, Model and the welding method.
- Create new report window opens, customised for the selected welding equipment. Fill in the required information, at least the name of the customer, the name of the validating inspector and name of the validation company.
Maximum and minimum values are preset in the form. Fill in the measured values, and the ArcValidator PC application will tell you whether the equipment passed the validation or not. - When you have filled in all the necessary information, the Export button becomes enabled and you can export the report into a PDF format certificate. You can also print the report/certificate or just close the report form. If you leave the report incomplete, click the Finalize button to complete the report when you open it later.
Exporting certificates
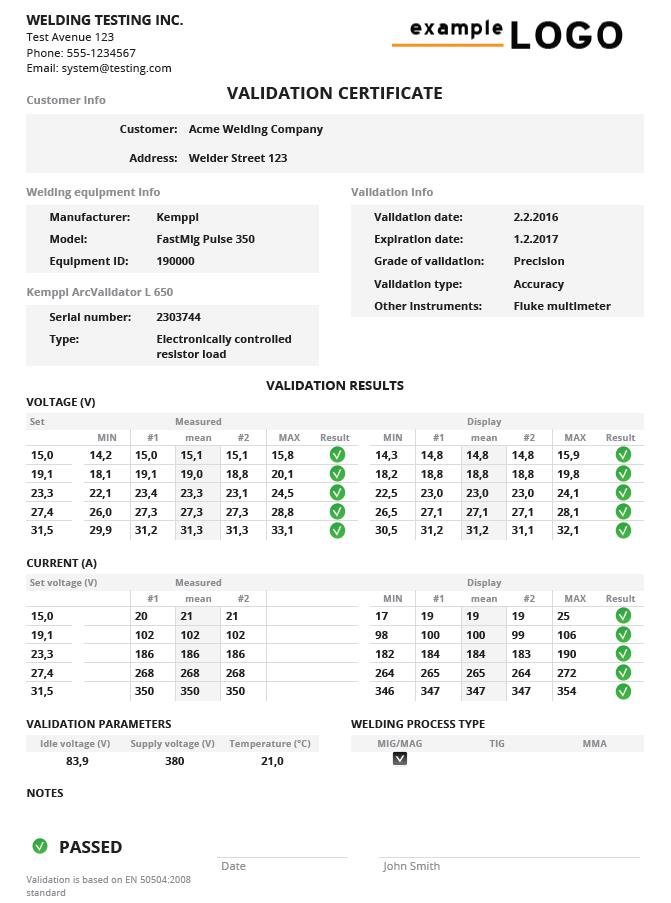
After your validation reports are finalized and complete, you can export them as certificates in PDF format.
To create PDF format certificates:
- On the Validation files list, select the finalized report or reports you want to export and click the EXPORT button.
- Browse for a suitable folder for certificate files and click OK.
- Click Save to create the PDF certificate file.
- The exported certificate is saved in the specified folder as a PDF file.
Managing equipment types and models
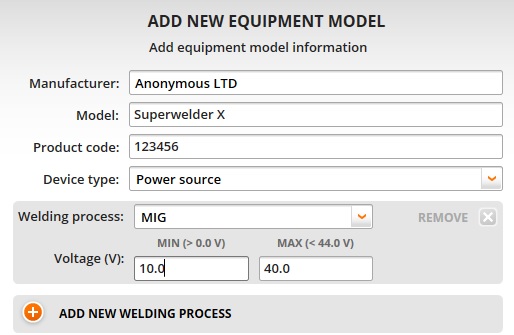
Adding new equipment models
If you validate Kemppi welding machines, all the equipment profiles will be available on the DataStick when you start. If you validate other manufacturer's machines, you can easily create the profiles for them yourself.
To add new equipment profiles for non-Kemppi equipment:
- Click the EQUIPMENT button on the top of the window to open the Equipment view.
- Click the NEW EQUIPMENT MODEL button.
- Fill in the information on the manufacturer, equipment model and the product code.
- Select the welding process used: MIG, MMA or TIG.
- Depending on the welding process, specify the minimum and maximum values for current or voltage.
- When you are done, click Save to save the changes and close the window.
The Add new equipment model window opens.
Editing equipment models
You can later edit and modify all equipment profiles you have created yourself. The provided Kemppi equipment profiles can only be copied but not edited.
To modify the equipment profiles for non-Kemppi equipment:
- Click the EQUIPMENT button on the top of the window to open the Equipment view.
- Click the equipment model whose information you want to edit.
- Modify the information on the manufacturer, equipment model and the product code, or click on CREATE COPY to create a copy.
- Select or remove the welding process used: MIG, MMA or TIG.
- Specify or edit the minimum and maximum values for current or voltage.
- When you are done, click Save to save the changes and close the window.
The Edit new equipment model window opens.

Adding welding processes
You can add welding processes to the equipment profiles you have created yourself. The provided Kemppi equipment profiles cannot be edited.
To add new welding processes to an equipment profile:
- Click the EQUIPMENT button on the top of the window to open the Equipment view.
- Click the equipment model you whose information you want to edit.
- Click the
 button to add a new welding process.
 - Select a welding process from the list: MIG, TIG or MMA.
- When you are done, click Save to save the changes and close the window.
The Edit equipment model window opens.

Updating the RC device software using PC
ArcValidator RC device software can be updated to a newer and improved version once in a while.
When there is a new software version available, you will be notified about the new version once you connect the DataStick to the PC USB connection.
The following window opens automatically:
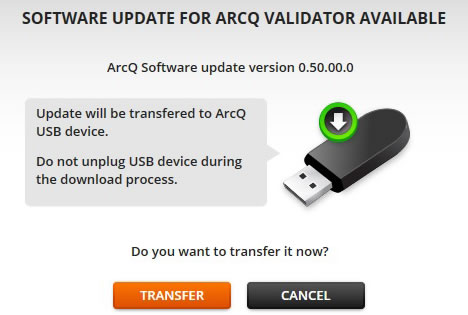
- Click the Transfer button to transfer the software update file to the DataStick.
When you connect the DataStick to the ArcValidator handset the next time, the software update will be installed.
Troubleshooting
Below you find a list of some problems that might occur, a likely reason for them, and a suggested solution. If you cannot solve the problem please contact technicalservice@kemppi.com.
| Problem | The most common reason | Solution |
|---|---|---|
| ArcValidator PC installation | ||
I cannot install the ArcValidator PC application and get the following error message. "System Update Required |
ArcValidator installation program requires that .Net Framework 4 or newer has been installed on your computer before installing the ArcValidator PC application. | Load Microsoft .Net Framework 4 here: http://www.microsoft.com/download/detail.aspx?id=24872 |
| ArcValidator RC handheld control device, ArcValidator L 650 load bank and the welding device | ||
| I connected the ArcValidator RC device to the ArcValidator L 650 load bank, but the RC keeps restarting. | The battery of the ArcValidator RC may be empty. |
|
| I connected the ArcValidator RC device to the ArcValidator L 650 load bank, but the RC does not start. | ArcValidator RC may be broken or the battery may be empty. |
|
| ArcValidator RC gives the error message 'Load bank cannot be found' | ArcValidator RC cannot find the ArcValidator L 650 load bank. |
|
| ArcValidator RC gives the error message 'Connection to welding machine has been lost', even though the welding device is connected to the L 650 load bank. | ArcValidator L 650 load bank has lost connection to the welding machine. |
|
| ArcValidator RC gives the error message 'Bus power disconnected', even though it is connected to the L 650 load bank. | ArcValidator RC power supply is blocked. |
|
| I tried to update the ArcValidator RC, but the device does not work. | It is possible that the ArcValidator RC update failed. |
|
| ArcValidator RC gives the error message 'It seems that the load bank has not been calibrated'? | ArcValidator L 650 load bank has not been calibrated or the calibration information has disappeared. | The L 650 load bank has to be sent for calibration. |
| ArcValidator RC gives the error message 'Invalid DataStick found'. | The USB memory stick connected to the ArcValidator RC is not an ArcValidator DataStick or the stick is corrupted. | Use another DataStick that came with the ArcValidator delivery package or order one from your Kemppi representative. |
| ArcValidator RC gives the error message 'ArcV DataStick cannot be found'. even though the ArcValidator DataStick is connected to the ArcValidator RC USB connector. | The DataStick may be damaged or corrupted. |
|
| ArcValidator RC gives the error message 'Overheat warning'. | ArcValidator L 650 load bank is overheated and may be damaged, if you don't let it cool down. | Do not turn off the ArcValidator L 650 load bank, but let its fans cool the device until the ArcValidator RC tells that validation can safely be continued. |
| ArcValidator RC gives the error message 'No equipment profiles saved on the DataStick'. | The DataStick memory sticks that come with the ArcValidator product do not contain the information needed in the validation of welding equipment, but the information has first to be copied to the memory stick using the ArcValidator PC application. |
|
| ArcValidator RC gives the error message 'Could not read equipment profiles'. | ArcValidator RC cannot read the welding equipment profile data from the DataStick. |
|
| ArcValidator RC gives the message 'Validation notification'. | The measuring accuracy of ArcValidator L 650 load bank has to be checked once a year, in order to prevent the validation results from being faulty because of inaccurate measurements. | The L 650 load bank has to be sent for calibration. |
| ArcValidator RC gives the error message 'It seems that welding equipment is connected to more than one wire feed unit'. | The welding system contains more than one wire feeder, but automatic validation is only possible in welding systems with only one wire feeder. | Disconnect the superfluous wire feeders from the system. |
| ArcValidator RC device gives the message ’Automatic validation is possible only when one welding panel is connected’. | More than one panel has been connected to the Synergic/M welding system, but automatic validation is only possible with one-panel welding systems. | Remove the superfluous panels from the system. |
| ArcValidator RC gives the message 'Validation report could not be saved'. | ArcValidator RC could not save the validation results on the DataStick. The stick may be full, read-only or corrupted. | Check that the DataStick memory is not full and that the DataStick is not write-protected. If not, use another DataStick that came with the ArcValidator delivery package or order one from your Kemppi representative. |
| ArcValidator RC gives the error message 'System error in load bank'. | A serious error has occurred the ArcValidator L 650 load bank that prevents the use of the system. | Restart the ArcValidator L 650 load bank. |
| ArcValidator DataStick and ArcValidator PC application | ||
| I connected the DataStick to the computer, but the PC application does not find it. | Windows does not regognise the memory stick or the memory stick is damaged. |
|